Tuesday, October 23, 2018

WiFi Connected But No Internet on Windows 10

If you’re having WiFi or wireless connection just fine, but the Internet isn’t working or you’re only with limited connectivity, you’re not alone. Many Windows 10 users are reporting this problem as well. But no worries, it’s possible to fix. 
Here are some effective solutions for you to try. You don’t need to try them all, just work your way down until you find the one that works. 

If You Can’t browse the web on any devices

If all your devices, laptops, mobile phones, tablets, are connected to the WiFi just fine, but have no Internet access, the problem might be your network hardware or the network itself. Try the solutions below to fix it: 
  • Restart your modem, router and your devices

1) Remove the power cord and the batteries (if there are any) from your modem and router. 

2) Wait for at least 30 seconds after the light goes out. Then plug the modem in. 

3) Wait for another 60 seconds, then plug your router in. 
  • Restart your PC

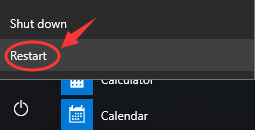
1) On your keyboard, click the Start button and Restart


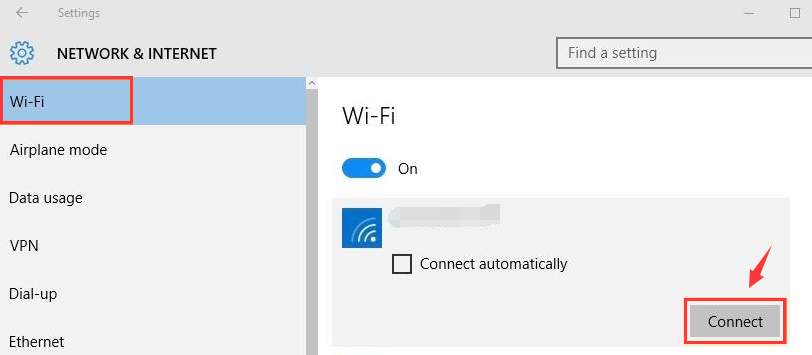
2) After your PC restarts, follow the path: click the Start button > Settings > Network & Internet > WiFi(on the left side of the pane). Select the network connection you have and click Connect


If the problem persists, try contact your network provider or the manufacturer of your router. 

Can browse the web on other devices but not on the laptop

  • Delete Temp Files

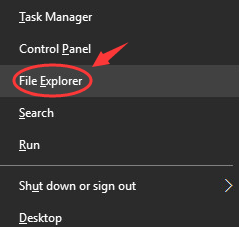
1) On your keyboard, press the Windows key and X at the same time, then click File Explorer


2) In the address box, type in C:\Windows\temp and press Enter


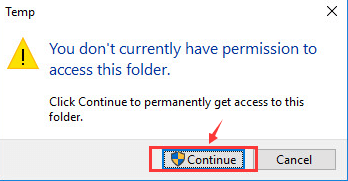
3) If you’re prompted about administrator permission, click Continue.  


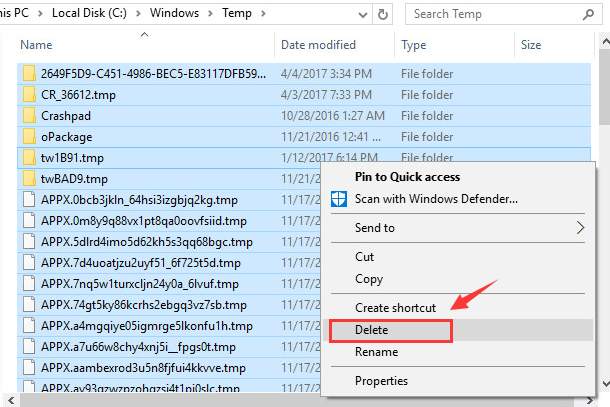
4) You’ll see many temp files here in this folder. Press Ctrl + A at the same time to select all the files, then right-click and click Delete.  


5) Now, re-connect to the network. See if the problem persists. 
  • Reset DNS 

1) Right-click the network connection icon at the bottom right corner and click Open Network and Sharing Center


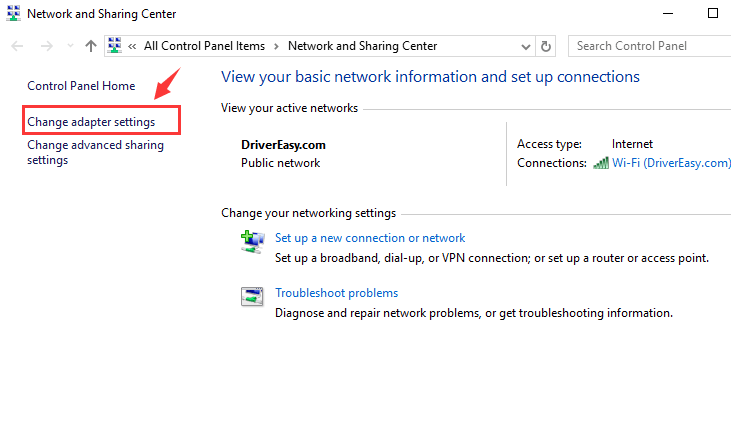
2) Click Change adapter settings

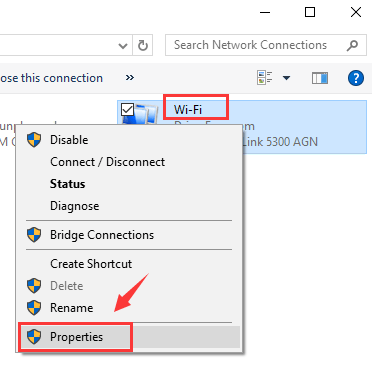
3) Right-click your WiFi adapter and click Properties


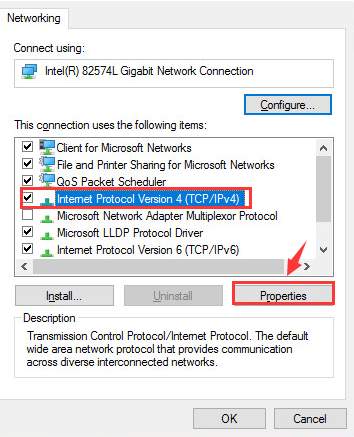
4) Select Internet Protocol Version 4 (TCP/IPv4) and click Properties


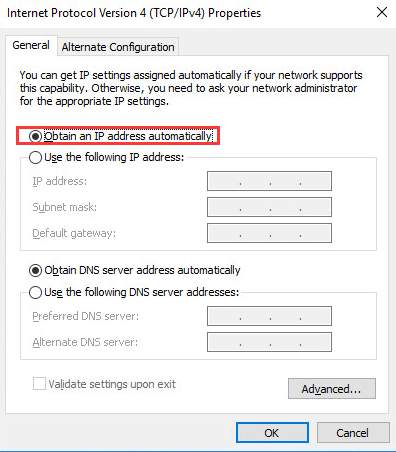
5) Click Obtain an IP address automatically


6) If you still can’t connect to the internet, select Use the following DNS server addresses and fill in the address like the screen shot below: 
Click OK

  • Run Commands in Command Prompt


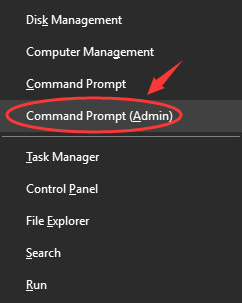
1) On your keyboard, press the Windows key and X at the same time, then click Command Prompt (Admin)


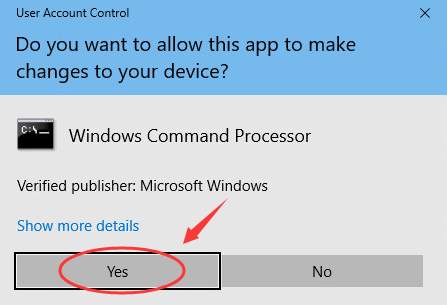
When prompted about the administrator permission, click Yes

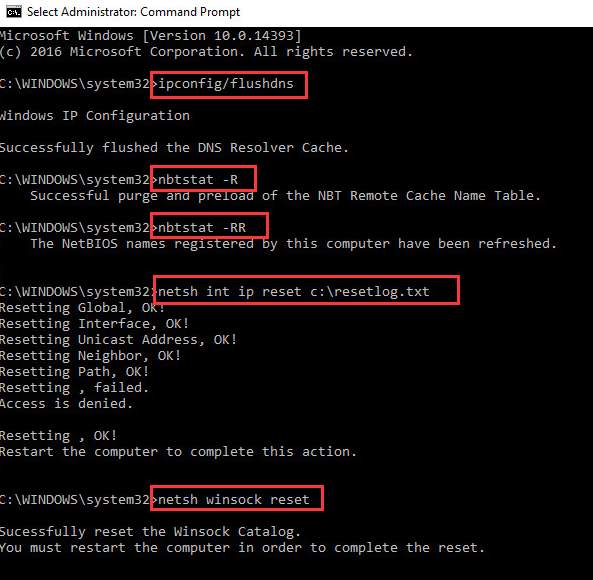
2) In the command prompt window, type in the following commands. Press Enter after each command. 
ipconfig/flushdns
nbtstat -R
nbtstat -RR
netsh int ip reset c:\resetlog.txt
netsh winsock reset


You may need to restart your computer for the changes to take effect. 

3) Right-click the WiFi connection icon at the bottom right corner and click Open Network and Sharing Center
4) Click Change adapter settings
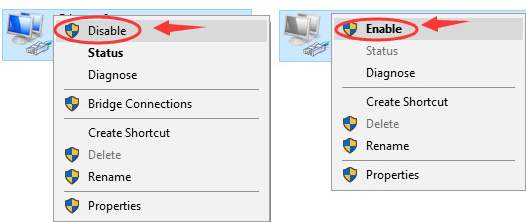
5) Right-click your WiFi adapter and click Disable. Wait for a while. Right-click your WiFi adapter and click Enable

  • Update Device Drivers

If the above methods don’t help, we highly recommend you update your network adapters’ drivers. 
If you don’t have the time, patience or computer skills to update your drivers manually, you can do it automatically with Driver Easy
Driver Easy will automatically recognize your system and find the correct drivers for it. You don’t need to know exactly what system your computer is running, you don’t need to risk downloading and installing the wrong driver, and you don’t need to worry about making a mistake when installing.
You can update your drivers automatically with either the FREE or the Pro version of Driver Easy. But with the Pro version it takes just 2 clicks (and you get full support and a 30-day money back guarantee):
1) Download and install Driver Easy.
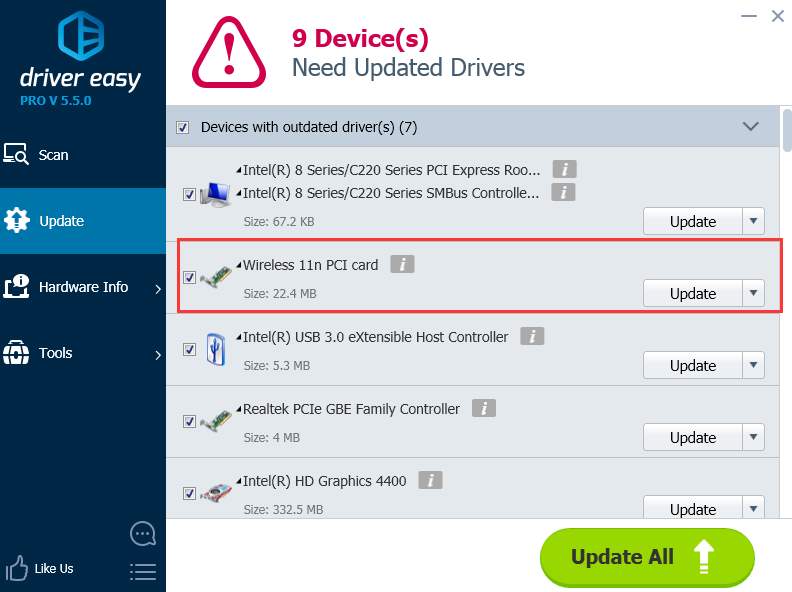
2) Run Driver Easy and click the Scan Now button. Driver Easy will then scan your computer and detect any problem drivers. 
3) Click the Update button next to the flagged network card driver to automatically download and install the correct version of this driver (you can do this with the FREE version). 
Or click Update All to automatically download and install the correct version of all the drivers that are missing or out of date on your system (this requires the Pro version – you’ll be prompted to upgrade when you click Update All). 

  • Update or uninstall McAfee


Quite a number of users found that this problem was gone once they replaced their McAfee with other antivirus programs. 

It’s still unknown why McAfee would hinder you from connecting to the Internet. But if you’re using McAfee as your antivirus program and the problem just won’t go away, update your McAfee to the latest version to have a try.  

Monday, November 13, 2017

How to use the Command Prompt to fix issues with your PC's boot records

You can use system recovery tools to fix most of your computer problems. However, there are times when you'll need to address such issues in a manual way, like, for example, when your Windows computer won't boot. In these cases, you can use a tool named Bootrec.exe. It can help you troubleshoot and repair things like the master boot record (MBR), the boot sector or the Boot Configuration Data (BCD) store. Here's how it works, in all modern versions of Windows:

NOTE: This guide covers Windows 10, Windows 7 and Windows 8.1.

Bootrec.exe - The ultimate repair tool for boot problems in Windows

No matter whether you use Windows 7 or Windows 10, if your operating system has trouble booting and Startup Repair can't fix the problem, it's worth trying the Bootrec.exe tool. With this tool you can repair the Master Boot Record (MBR), write a new boot sector, rebuild the Boot Configuration Data (BCD) and add missing Windows installations to the boot configuration data.
If you need to know what all these mean, here’s an explanation for each of them:
  • Master Boot Record (MBR) - the first sector of your system drive. Its purpose is to tell the computer’s BIOS where to look for the operating system, so that it can start it.
  • Boot sector - the region of the disk that contains the code to be loaded into the RAM memory, that is necessary to load the operating system. A boot sector must have a specific disk signature to be seen by BIOS as a boot sector. If this signature is corrupted, or has been changed, the BIOS will not be able to find the boot sector and won't be able to load the necessary instructions for finding and starting the operating system. In Windows 7 and newever versions of Windows, the boot sector loads the Windows Boot Manager, accesses the Boot Configuration Data and uses this information to load the operating system
  • Boot Configuration Data (BCD) - The BCD is a database of boot-time configuration data that is used by the Windows Boot Manager. The Boot Configuration Data is stored in a data file that has the same format as the Windows Registry.

How to start the Command Prompt when Windows won’t load successfully

In order to be able to use Bootrec.exe, you'll have to use Command Prompt. However, because you already have startup issues, it's obvious that you won't be able to simply run it from Windows.
You need to use a repair disc or a recovery drive that was created on a working Windows computer. Here are some guides that will help you create such discs/drives:
Once you have recovery drive/disc created, boot from it. In order to do that, plug it in and start your Windows computer or device. Immediately after it starts, press the boot device selection key on your keyboard. It’s usually the F12, F11 or the Escape key, but it could be another as well, depending on the manufacturer of your device’s mainboard. Doing that will make your computer display a boot priority selection menu. Use the arrow keys on the keyboard to select the recovery drive. Then, press Enter and, when asked to press any key to boot from that drive, do so.
Command Prompt, boot, issues, Bootrec.exe
If you are using Windows 10 or Windows 8.1, once your PC boots from the USB drive, you will be asked to choose the keyboard layout that you want to use. When this happens, click or tap on the layout that matches your keyboard. To navigate between all the available keyboard layouts, press “See more keyboard layouts”.
Command Prompt, boot, issues, Bootrec.exe
The list of available keyboard languages is quite long and you may have to scroll a lot until you find the layout that you want to use. On the next screen, you should click or tap on Troubleshoot (Reset your PC or see advanced options).
Command Prompt, boot, issues, Bootrec.exe
On the Advanced options screen, click or tap on Command Prompt.
Command Prompt, boot, issues, Bootrec.exe
If you are using Windows 7, first, select the keyboard input method that you want to use and click Next.
Command Prompt, boot, issues, Bootrec.exe
Then, it scans for available Windows installations and lists those that are found. Select the Windows 7 installation that you want to repair and click Next.
Command Prompt, boot, issues, Bootrec.exe
Then, when the list of available System Recovery Options are shared, click Command Prompt.
Command Prompt, boot, issues, Bootrec.exe
Once you've launched the Command Prompt, type the command bootrec.exe and hit Enter to see the options that are available for this tool. As you can see in the screenshot below, there are four parameters available: /FixMbr, /FixBoot, /ScanOsand /RebuildBcd.
Command Prompt, boot, issues, Bootrec.exe
Let’s see how each of them can help you solve your computer’s boot problems. Keep in mind though, that even if the Bootrec.exe tool can handle most boot problems, it does not guarantee success in every possible situation.

How to repair the Master Boot Record (MBR)

The first parameter of the Bootrec.exe tool is /FixMbr. It allows the repair of a corrupted or damaged Master Boot Record (MBR). Usually, you will use this parameter when you are faced with one of these error messages: “Operating System not found"“Error loading operating system"“Missing operating system" or “Invalid partition table". To start the repair process of the MBR, run the command: bootrec.exe /fixmbr.
Command Prompt, boot, issues, Bootrec.exe

How to write a new boot sector

The /FixBoot parameter writes a new boot sector to the system partition. The tool will use a boot sector that is compatible with your Windows version. Using this parameter is useful in the following situations:
  • The boot sector has been replaced with a non-standard Windows boot sector;
  • The boot sector is damaged;
  • An earlier Windows operating system has been installed after your version of Windows was installed.
To start writing a new boot sector, use this command: bootrec.exe /fixboot.
Command Prompt, boot, issues, Bootrec.exe

How to rebuild the Boot Configuration Data (BCD)

The Boot Configuration Data (BCD) contains a detailed list of what is supposed to load at startup. Microsoft indicates that a boot error can also be caused by missing or damaged files in the BCD. The /rebuildbcd parameter can be very useful when you must fix some errors by completely rebuilding the BCD. To completely rebuild the Boot Configuration Data, run this command: bootrec.exe /rebuildbcd.
Command Prompt, boot, issues, Bootrec.exe

How to add missing Windows installations to the Boot Configuration Data

If your computer has multiple operating systems installed but not all of them are available, use the /ScanOS option. Using this parameter on Bootrec.exe will launch a scan on all disks for any Windows installations that are not currently included in the Boot Configuration Data (BCD). In the screenshot below, you can see how this scan process might look.
Command Prompt, boot, issues, Bootrec.exe
If the bootrec.exe /scanos command returns results, you will be able to continue the repair process. In the end, you will get the lost Windows installation back into the secure BCD table, thus making it bootable again.
Command Prompt, boot, issues, Bootrec.exe
First of all, you have to clean the Master Boot Record (MBR) by using bootrec /fixmbr. Next, type bootsect.exe /nt60 all /forceand press Enter. The /nt60 parameter applies the master boot code that is compatible with BOOTMGR. The /all argument updates the master boot code on all partitions. The /force parameter forcibly dismounts the volume(s) during the boot code update so that the Bootsect.exe tool does not gain exclusive volume access.
Command Prompt, boot, issues, Bootrec.exe
Running all these commands will create a new MBR and tell it to use the correct Windows boot loader in order to load that specific installation from your drive.

Wednesday, July 13, 2016

Installing Linux in a file in an NTFS partition

You received a nice laptop from your company to work with, with excellent processing capabilities, a reasonable display and a good amount of RAM. The computer is supposed to be used for scientific research. You want to unleash all this power. However, the computer has two important limitations:

  • Even though we are at the end of 2011, with many powerful Linux distributionsavailable and even with Windows 8 on the horizon, someone decided that this otherwise excellent machine should instead run on the obsolete Windows XP.
  • Due to policy issues, and not hardware or software limitations, it is not possible to partition the internal hard disk and install any other operating system for dual boot. The rationale stems from a single policy for all the departments.
There is no limitation on storing data, but there are also limitations on installing software to run in Windows. VirtualBox is explicitly blocked, as well as a number of other important applications.
A possible alternative to this hideous scenario could be run a Live CD of any recent Linux distribution. However, storing data between sessions in these live systems is complicated. Even more is to install additional software as needed.
Another possibility would be run the OS from an external drive. This works perfectly. However, for a laptop, to keep carrying the external disk all the time is cumbersome. Moreover, the disk takes a couple of seconds to be enabled again after a sleep or hibernation, so the system may not resume properly when trying to wake up.
A solution is as follows: create a large file in the NTFS partition, install Linux inside this file, and boot the system from an USB flash drive. To discourage curiosity, the file can be encrypted. This article describes the steps to accomplish this task usingopenSUSE, but a similar strategy should work with any recent distribution.

Requirements

  • A computer with an NTFS partition, inside which you want to have Linux, without tampering with the actual Windows installation.
  • openSUSE installation DVD (tested with 12.1, and should work with other recent versions). Similar steps may work with other distributions.
  • USB flash drive which will be used to boot the Linux system and will also store the kernel. This flash drive must stay connected during all the time in which the system is on, therefore it is more convenient if it is physically small. See a picture below.
  • An external USB hard disk, to be used for a temporary installation that will be transferred to the file in the NTFS partition.

The procedure

Step 1: Plug the external hard disk and install openSUSE in it. Choose the desktop environment that suits you better (e.g. KDE/GNOME or other). It’s advisable to make this choice now, as it will save you time and effort, instead of leaving to add the graphical mode later. Leave /boot on its own partition as it will also facilitate steps later. Do not create a swap partition for this installation (ignore warnings that may appear because of this). Let’s call this as the system “E”, as it will reside temporarily on the External disk.
During the installation, install GRUB to the external disk itself, not to the internal drive (i.e., not /dev/sda), as you don’t want to tamper with the structure of internal hard drive or with the way as Windows boots. Before restarting the new system, if you changed the partitioning of the external disk, make sure that the partition that contains /boot has the “bootable” flag active (use fdisk to fix if needed).
Step 2: Make another install of openSUSE, this time to the flash drive. Again, put /boot on its own partition. Be generous with /boot, as it will accommodate 2 ramdisks and perhaps 2 or more kernels. Use at least 100MB. This installation can (and should) be the minimal, with no X (text-only). Let’s call this as system “F”, as it will reside in the USB Flash drive.
For a 16GB USB drive, a suggestion is:
  • 1st partition: 14GB, FAT or similar, to use as a general USB drive, nothing special.
  • 2nd partition: 1.8GB, ext4, to be mounted as as /, and where the system will reside.
  • 3rd partition: 0.2GB, ext4, to be mounted as /boot.
During the installation:
  • Like in the installation to the external hard disk, do not install GRUB to the internal drive, but to the USB memory stick.
  • For the list of software, install the ntfs-3gntfsprogs and cryptsetup. Install the man pages as well, as they may be useful.
Before booting the system F, make sure that the partition that contains /boot is bootable (use fdisk to fix if needed).
Step 3: Boot the system F, the flash drive. First task is to create the volume inside the NTFS filesystem, which will store the whole Linux system:
a) Create a key-file. No need for paranoia here, as the encryption is only to discourage any curious who sees these big files from Windows. Just a simple text file stored in the USB flash drive, separate from the encrypted volume:
echo SecretPassword | sha1sum > /root/key.txt
Note that in the command above, the password is not “SecretPassword”, but instead, the content of the file key.txt, as produced by the command sha1sum. This includes the space and dash (-) that are inside, as well as a newline character (invisible) at the end.
Do not store the keyfile in the NTFS partition. Put it, e.g., in the /root directory of the flash drive.
b) Mount the physical, internal hard drive that contains the NTFS partition:
mkdir -p /host
mount -t ntfs /dev/sda1 /host
c) Create a big file with random numbers in the NTFS partition. This will be the place where the full system will reside. For 100GB, use:
dd if=/dev/urandom of=/host/ntfsroot bs=2048 count=50000000
This will take several hours. You may want to leave it running overnight.
d) Mount it as a loop device:
losetup /dev/loop0 /host/ntfsroot
e) Initialize as a LUKS device:
cryptsetup luksFormat /dev/loop0 /root/key.txt
A message that any data on the device will irrevocably be deleted is shown. In this case, the device is the file full of random bits that we just created. So, confirm by typing ‘YES’ in capital letters.
f) Make a device-mapping:
cryptsetup luksOpen /dev/loop0 root --key-file /root/key.txt
This will create a /dev/mapper/root device, which is an unencrypted view of the content of the big file previously created. The /dev/loop0 is an encrypted view and is not meaningful for reading/writing.
g) Create the file system that later will host the root (i.e., /):
mkfs.ext4 -b 1024 /dev/mapper/root
The block size will be 1024. Smaller sizes will mean more free disk space for a given amount of stored data.
h) Repeat the steps b-g for what will be the swap partition (8GB in this example):
dd if=/dev/urandom of=/host/ntfspage bs=2048 count=4000000
losetup /dev/loop1 /host/ntfspage
cryptsetup luksFormat /dev/loop1 /root/key.txt
cryptsetup luksOpen /dev/loop1 swap --key-file /root/key.txt
mkswap /dev/mapper/swap
Step 4: [optional] Having made the initial configurations for the future / and swap, it’s now time to make a small modification of the initrd of the flash drive, so that it can boot from USB 3.0 if needed (even if the flash drive itself is 2.0, this step is still needed if you plan to plug it into an USB 3.0 port in the same computer):
a) Make a backup copy of the original initrd and update the symbolic link:
cd /boot
cp -p initrd-3.1.0-1.2-desktop initrd-3.1.0-1.2-opensuse
rm initrd
ln -s initrd-3.1.0-1.2-opensuse initrd
b) Edit the /etc/sysconfig/kernel and add the xhci-hcd module to the initial ramdisk:
INITRD_MODULES="xhci-hcd"
c) Run mkinitrd to create a new ramdisk.
cd /boot
mkinitrd
d) Rename it to something more representative:
mv /boot/initrd-3.1.0-1.2-desktop /boot/initrd-3.1.0-1.2-usbflash
The newly generated initrd will load the system that will be left in the flash drive, now with support for USB 3.0, and won’t be changed from now on.
Step 5: Restart the computer and boot into the system E (the external hard disk)
a) Edit the /etc/sysconfig/kernel and add these modules to the initial ramdisk:
INITRD_MODULES="xhci-hcd fuse loop dm-crypt aes cbc sha256"
Again, the xhci-hcd module is to allow booting the system from an USB 3.0 port (even if the flash drive is 2.0). If you don’t have USB 3.0 ports, this module can be omitted. The other modules are necessary to mount the NTFS partition, to mount files as a loopback devices, and to allow encryption/decryption using the respective algorithms and standards.
b) Run mkinitrd to create a new ramdisk.
cd /boot
mkinitrd
c) Make a copy of the newly created initrd to a place where it can be edited.
cp /boot/initrd-3.1.0-1.2-desktop /root/initrd-3.1.0-1.2-harddisk
mkdir /root/initrd-harddisk
cd /root/initrd-harddisk
cat ../initrd-3.1.0-1.2-harddisk | gunzip | cpio -id
d) Inside the initrd, edit the file boot/83-mount.sh (i.e. /root/initrd-harddisk/boot/83-mount.sh) and replace all its content by:
1
2
3
4
5
6
7
8
9
10
11
12
13
14
15
16
17
18
19
20
21
22
#!/bin/bash
 
# This will be the mountpoint of the NTFS partition
mkdir -p /host
 
# Mount the NTFS partition
ntfs-3g /dev/sda1 /host
 
# Mount the 100GB file as a loop device
losetup /dev/loop0 /host/ntfsroot
 
# Open the file for decryption (as a mapped device)
cryptsetup luksOpen /dev/loop0 root --key-file /key.txt
 
# Mount the ext4 filesystem on it as /root
mount -o rw,acl,user_xattr -t ext4 /dev/mapper/root /root
 
# Mount the 8GB file as a loop device
losetup /dev/loop1 /host/ntfspage
 
# Open the file for decryption (as a mapped device)
cryptsetup luksOpen /dev/loop1 swap --key-file /key.txt
e) Copy the losetupcryptsetupdmsetup and ntfs-3g executables to the initrd:
cp /sbin/losetup /sbin/cryptsetup /sbin/dmsetup /root/initrd-harddisk/sbin
cp /usr/bin/ntfs-3g /root/initrd-harddisk/bin
f) Copy also all the required libraries for these executables that may be missing (use ldd to discover which). There is certainly a way to script this, but to prepare and test the script will take as much time as to copy them manually. This has to be done just once.
g) Recreate the initrd:
cd /root/initrd-harddisk
find . | cpio -H newc -o | gzip -9 > ../initrd-3.1.0-1.2-harddisk
h) Copy the new initrd to the /boot partition of the USB flash drive, not to the /boot of the external hard disk. So, plug the USB drive and mount its boot partition:
mkdir -p /mnt/usbroot
mount -t ext4 /dev/sdX3 /mnt/usbboot
cp -p /root/initrd-3.1.0-1.2-harddisk /mnt/usbboot/
Step 6: Restart the system, now booting again into the system F (the USB flash drive):
a) Create two short scripts to mount and umount the encrypted filesystem. This will save time when you boot through the pendrive to do any maintenance on the installed system:
1
2
3
4
5
6
7
#!/bin/bash
mkdir -p /host
mount -t ntfs /dev/sda1 /host
losetup /dev/loop0 /host/ntfsroot
cryptsetup luksOpen /dev/loop0 root --key-file /root/key.txt
mkdir -p /mnt/ntfsroot
mount -t ext4 /dev/mapper/root /mnt/ntfsroot
1
2
3
4
5
6
7
#!/bin/bash
umount /mnt/ntfsroot
rmdir /mnt/ntfsroot
cryptsetup luksClose root
losetup -d /dev/loop0
umount /dev/sda1
rmdir /host
b) Execute the first, so that the file in the NTFS partition is mounted at /mnt/ntfsroot.
c) Mount the external disk partition that contains the / for the system E:
mkdir -p /mnt/hdroot
mount -t ext4 /dev/sdc2 /mnt/hdroot
d) Copy the whole system to the new location:
cp -rpv /mnt/hdroot/* /mnt/ntfsroot/
After this point, the external hard drive is no longer necessary. It can be unmounted and put aside.
e) Edit the /mnt/ntfsroot/etc/fstab to reflect the new changes:
/dev/mapper/swap    swap    swap    defaults          0  0
/dev/mapper/root    /       ext4    acl,user_xattr    1  1
Step 7: Modify GRUB to load the appropriate initrd and load the respective system. Open the /boot/grub/menu.lst and make it look something like this:
1
2
3
4
5
6
7
8
9
10
11
12
13
14
15
16
17
18
19
default 0
timeout 8
 
title openSUSE 12.1 -- Hard Disk
    root (hd0,2)
    kernel /vmlinuz-3.1.0-1.2-desktop splash=silent quiet showopts vga=0x317
    initrd /initrd-3.1.0-1.2-harddisk
 
title openSUSE 12.1 -- USB Flash Drive
    root (hd0,2)
    kernel /vmlinuz-3.1.0-1.2-desktop splash=silent quiet showopts vga=0x317
    initrd /initrd-3.1.0-1.2-usbflash
 
title Windows XP
    map (hd1) (hd0)
    map (hd0) (hd1)
    rootnoverify (hd1,0)
    makeactive
    chainloader +1
The only difference between the first and second entries is the initrd. In the first, the initrd will load the system that is inside the file in the NTFS partition, and which will contain the full graphical system. In the second, the initrd will load the simpler, text-only install on the USB flash drive.

Concluding remarks

We installed a modern, cutting edge Linux distribution inside a regular file in an NTFS partition. We did not modify any of the settings of Windows XP, neither did we partition the internal hard disk, nor tampered with the Windows registry or did anything that would violate any company rule. The boot loader, the kernel, and the initrd were left in an external device, the USB flash drive. When seen from Windows, only two inoffensive and unsuspicious files appear in the C:\. They contain the quiescent power of Linux.