Monday, November 21, 2011

How to Reset / Remove / Bypass a BIOS or CMOS Password?

BIOS passwords are used to add some extra security to computers. You can either set a password to prevent access to BIOS settings or to prevent PC from booting.
But sometimes this extra security might become a pain when you forget the BIOS password or someone changes your system BIOS password intentionally.
But there is no need to worry. There are many known ways to reset / remove / bypass the password:
  • By removing CMOS battery
  • By using motherboard jumper
  • By using MS DOS command
  • By using software
  • By using Backdoor BIOS password
Now I'll try to explain each method one by one:
DISCLAIMER: This information is intended for experienced users. It is not intended for basic users, hackers, or computer thieves. Please do not try any of following procedures if you are not familiar with computer hardware. We'll not be responsible for the use or misuse of this information, including personal injury, loss of data or hardware damage. So use it at your own risk.
By Removing CMOS Battery:
CMOS_Battery.jpg
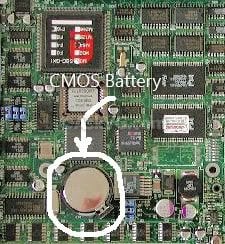
Almost all motherboards use a small coin sized CMOS battery to store all BIOS settings along with the password. To reset the password, unplug the PC, open the cabinet and remove the CMOS battery for approx. 15-30 minutes and then put it back. It'll reset all BIOS settings as well as the password and you'll need to re-enter all settings.
If it fails, then try to remove the battery for at least one hour.
By Using Motherboard Jumper:
Almost all motherboards contain a jumper that can clear all CMOS settings along with the BIOS password. The location of this jumper varies depending upon the motherboard brand. You should read your motherboard manual to check its location. If you don't have the manual then look for the jumpers near the CMOS battery. Most of the manufacturer label the jumper as CLR, CLEAR, CLEAR CMOS, etc.
When you find the jumper, look carefully. There will be 3 pins and the jumper will be joining the center pin to either left or right pin. What you need to do, is remove the jumper and join the center pin to the opposite pin. e.g. if the jumper joins center pin to left pin, then remove it and join center pin to right pin. Now wait for a few seconds and then again remove the jumper and join the center pin to left pin.
Make sure to turn the PC off before opening the cabinet and resetting the jumper.
By Using MS DOS Command:
This method works only if you have access to the system when its turned on because this method requires MS DOS. Open Command Prompt from Programs menu and provide following commands one bye one:
debug
o 70 2E
o 71 FF
quit
NOTE: The first character in the above commands is English alphabet "o" and not the number 0.
After providing the above commands, restart your system and it should reset the CMOS Settings along with the BIOS password.
If you are curious to know how it works? then let me explain the above commands:
In this method we are using the Debug tool of MS DOS. The "o" character present at first in these commands, outputs the values to IO ports. The number 70 and 71 are port numbers which are used to access CMOS memory. By providing FF value we are telling CMOS that there is an invalid checksum and it resets the CMOS settings as well as BIOS password.
By Using Software:
There are a few software which can also reset CMOS settings or BIOS password or both within a few clicks. But as stated above you should have access to a system which is turned on and should have access to MS DOS or MS Windows:
CmosPwd
KillCMOS
By Using Backdoor BIOS Password:
Some BIOS manufacturer put a backdoor password in BIOS which always works irrespective of what password you have set in BIOS. Its a master password which is used for testing and troubleshooting purposes.
AMI BIOS Passwords:
A.M.I.
AAAMMMIII
AMI?SW
AMI_SW
AMI
BIOS
CONDO
HEWITT RAND
LKWPETER
MI
Oder
PASSWORD
AWARD BIOS Passwords:
01322222
589589
589721
595595
598598
ALFAROME
ALLy
aLLy
aLLY
ALLY
aPAf
_award
award
AWARD_SW
AWARD?SW
AWARD SW
AWARD PW
AWKWARD
awkward
BIOSTAR
CONCAT
CONDO
Condo
d8on
djonet
HLT
J64
J256
J262
j332
j322
KDD
Lkwpeter
LKWPETER
PINT
pint
SER
SKY_FOX
SYXZ
syxz
shift + syxz
TTPTHA
ZAAADA
ZBAAACA
ZJAAADC
PHOENIX BIOS Passwords:
BIOS
CMOS
phoenix
PHOENIX
Misc Common Passwords:
ALFAROME
BIOSTAR
biostar
biosstar
CMOS
cmos
LKWPETER
lkwpeter
setup
SETUP
Syxz
Wodj
Other Manufacturer BIOS Passwords:
Biostar - Biostar
Compaq - Compaq
Dell - Dell
Enox - xo11nE
Epox - central
Freetech - Posterie
IWill - iwill
Jetway - spooml
Packard Bell - bell9
QDI - QDI
Siemens - SKY_FOX
TMC - BIGO
Toshiba - Toshiba
VOBIS & IBM - merlin
NOTE: All these passwords are case-sensitive and are changed from time to time by manufacturers.

List of Windows XP System Files to be Hacked Using Resource Hacker

Here is a list of Windows XP system files, which can be edited using Resource Hacker to change the look-n-feel of Windows:
%windir%\System32\NToskrnl.exe : To change Windows Boot screen
%windir%\System32\Logonui.exe : To change Windows Login Screen
%windir%\System32\MSgina.dll : To change the text & background of Shutdown dialog box
%windir%\System32\Shell32.dll : To change a lot of things, like Progress dialog box (copying, deleting, etc.), Run dialog box, Context menu items, and many other things
%windir%\System32\Netshell.dll : To change flashing internet icon in system tray
%windir%\System32\Comdlg32.dll : To change the look of Open/Save dialog box, color box, print box, find & replace box, etc.
%windir%\System32\Comctl32.dll : To change the icons appearing in upper-right side of Open/Save dialog box.
%windir%\System32\Stobject.dll : To change volume icon & some other icons in system tray
%windir%\System32\hotplug.dll : To change safe to remove hardware icon
%windir%\System32\mydocs.dll : To change My Documents icon
%windir%\System32\shdocvw.dll : To change Internet Explorer 6 icons and graphics
%windir%\System32\IEFrame.dll : To change Internet Explorer 7 icons and graphics
%windir%\System32\shimgvw.dll : To change image file icons, i.e., BMP, JPG, JPEG, GIF, etc
%windir%\System32\Sysdm.cpl : To change the System Properties window look
%windir%\System32\Winlogon.exe : To change the text, which you see in Login Screen, like applying user settings, logging off, shutting down, etc.
%windir%\Explorer.exe : To change Start button text, Programs Menu text (like Programs, Favorites, Documents, etc.)
%windir%\System32\browselc.dll : To change the Menu names in Windows Explorer as well as Internet Explorer
Windows XP Setup folder\I386\Winntbbu.dll : To change XP Setup look and text entries

List of Resource Locations in Windows XP, Vista and 7 to be Hacked Using Resource Hacker

Here are a few COMMON changes/hacks, which most of the people want to make in Windows. In this tutorial, we'll tell you the exact location of the things, you want to change:
Changing look of RUN Dialog Box
Open %windir%\System32\shell32.dll file, and goto: Dialog -> 1003 -> 1033.
Changing Progress Dialog Box (The box which appears while Copying/pasting/deleting stuffs)
Open %windir%\System32\shell32.dll file, and goto: Dialog -> 1020 -> 1033.
Changing look of Open With box
Open %windir%\System32\shell32.dll file, and goto: Dialog -> 1063 -> 1033 & Dialog -> 1070 -> 1033.
Changing look of Classic Logoff dialog box
Open %windir%\System32\shell32.dll file, and goto: Dialog -> 1071 -> 1033.
Changing look of Drive Properties box
Open %windir%\System32\shell32.dll file, and goto: Dialog -> 1080 -> 1033 & Dialog -> 1081 -> 1033.
Changing look of New Logoff dialog box
Open %windir%\System32\shell32.dll file, and goto: Dialog -> 1089 -> 1033.
Changing look of the box, which appears when Windows asks to select application/search with web service to open the UNKNOWN file type
Open %windir%\System32\shell32.dll file, and goto: Dialog -> 1091 -> 1033.
Changing look of Autoplay box
Open %windir%\System32\shell32.dll file, and goto: Dialog -> 1119 -> 1033.
Changing look of Folder Customize box
Open %windir%\System32\shell32.dll file, and goto: Dialog -> 1124 -> 1033.
Changing look of Windows Default CD Writing Wizard
Open %windir%\System32\shell32.dll file, and goto: Dialog -> 1125 to 1138 -> 1033.
Changing look of Classic Shutdown dialog box
Open %windir%\System32\shell32.dll file, and goto: Dialog -> 8226 -> 1033.
Changing look of About Windows dialog box
Open %windir%\System32\shell32.dll file, and goto: Dialog -> 14352 -> 1033.
Changing look of Format Drive dialog box
Open %windir%\System32\shell32.dll file, and goto: Dialog -> 28672 -> 1033.
Changing look of Scandisk dialog box
Open %windir%\System32\shell32.dll file, and goto: Dialog -> 28800 -> 1033.
Changing look of Desktop tab in Desktop Properties box
Open %windir%\System32\shell32.dll file, and goto: Dialog -> 29952 to 29956 -> 1033.
Changing look of Folder Options box
Open %windir%\System32\shell32.dll file, and goto: Dialog -> 29959 & 29960 -> 1033.
Changing look of DOS Properties box
Open %windir%\System32\shell32.dll file, and goto: Dialog -> 32768 - 32885 -> 1033.
Changing look of Taskbar & Start Menu Properties box
Open %windir%\Explorer.exe file, and goto: Dialog -> 6 to 1135 -> 1033.
Changing look of Windows Security box, which appears when we press <Ctrl>+<Alt>+<Del> keys while Welcome Screen is Disabled
Open %windir%\System32\Msgina.dll file, and goto: Dialog -> 1800 -> 1033.
Changing look of Shutdown Reason UI box
Open %windir%\System32\Msgina.dll file, and goto: Dialog -> 2200 -> 1033.
Changing look of New Shutdown dialog box
Open %windir%\System32\Msgina.dll file, and goto: Dialog -> 20100 -> 1033.
Changing look of Shutdown Timer box
Open %windir%\System32\WinLogon.exe file, and goto: Dialog -> 1300 -> 1033.
Changing look of System Properties box
Open %windir%\System32\Sysdm.cpl file, and goto: Dialog -> 41 to 4103 -> 1033.
Changing look of Choose Color box
Open %windir%\System32\Comdlg32.dll file, and goto: Dialog -> CHOOSECOLOR -> 1033.
Changing look of Choose Font box
Open %windir%\System32\Comdlg32.dll file, and goto: Dialog -> 401 & 1543 -> 1033.
Changing look of Printer Properties box
Open %windir%\System32\Comdlg32.dll file, and goto: Dialog -> 1538 & 1539 & 1546 -> 1033.
Changing look of Open/Save Dialog box
Open %windir%\System32\Comdlg32.dll file, and goto: Dialog -> 1547 * 1552 -> 1033.
Changing look of Many tabs in Desktop Properties box
Open %windir%\System32\ThemeUI.dll file, and goto: Dialog -> 1000 to 1017 -> 1033.
Changing look of Classic Programs Menu
Open %windir%\Explorer.exe file, and goto: Menu -> 204 -> 1033.
Changing look of Taskbar Context Menu
Open %windir%\Explorer.exe file, and goto: Menu -> 205 -> 1033.
Changing the Start button Text
Open %windir%\Explorer.exe file, and goto: String Table -> 37 -> 1033 -> 578 (For New Theme) & String Table -> 38 -> 1033 -> 595 (For Classic Theme).
Changing the Start Button Tool-Tip Text
Open %windir%\Explorer.exe file, and goto: String Table -> 51 -> 1033 -> 800.
Changing the Log off, Shutdown, Search, Help & Support, Run, etc. Text entries in New Start Menu
Open %windir%\Explorer.exe file, and goto: String Table -> 439 -> 1033.
Changing the Internet & E-Mail text in New Start Menu
Open %windir%\Explorer.exe file, and goto: String Table -> 440 -> 1033.
Changing the All Programs text in New Start Menu
Open %windir%\Explorer.exe file, and goto: String Table -> 515 -> 1033 -> 8226.
Changing Connect to, Control Panel, Favorites, My Recent Documents text entries in New Start Menu
Open %windir%\Explorer.exe file, and goto: String Table -> 515 -> 1033.
Changing Start Button Icon
Open %windir%\Explorer.exe file, and goto: Bitmap -> 143 -> 1033.
Changing Left-Side Image in Classic Start Menu
Open %windir%\Explorer.exe file, and goto: Bitmap -> 167 -> 1033.

Tweak Me: Excellent Windows Tweaker, Temp File Cleaner, Startup Manager and Context Menu Editor

Today we are going to share an excellent and very useful freeware for Windows XP, Windows Vista, Windows 7 and Windows 8 Developer Preview.
"Tweak Me" can be considered as a powerful pack of various useful utilities which are generally downloaded and installed separately. It comes with following components:
  • Windows Tweaker
  • Temp File Cleaner
  • Startup Manager
  • Context Menu Editor
The first component "Windows Tweaker" allows you to tweak lots of hidden settings in Windows like disable Action Center, customize Aero glass effects, tweak Internet Explorer, Windows Media Player, Windows Update, User Account Control, etc. It also allows you to enable/disable various features to increase system performance and security.
Tweak_Me_Tweaks_Page.png
Second component "Cleaner" is an alternative to CCleaner. It allows you to delete various temporary files from your system to get free space on your hard disk. You can clear browser cache, cookies, history, logs, driver cache and much more. Just select the desired options and click on "Analyze" button to get info about how much free space will you get after removing the temp files. When decided, you can click on "Clean" button to remove the temp files.
Tweak_Me_Cleaner_Page.png
"Startup" is a replacement for Windows built-in msconfig utility which allows you to enable/disable startup programs to make Windows startup faster. Simply uncheck the checkbox for a program which you don't want to start with Windows.
Tweak_Me_Startup_Page.png
"Context Menu" page allows you to remove unnecessary or unwanted options from context menu (right-click menu) of files, folders, drives, etc. It shows a list of all options available, you can uncheck the options which you don't want to see in context menu.
Tweak_Me_Context_Menu_Page.png
Apart from these 4 components, it also allows you to tweak settings related to SSD optimization. To access these settings, click on "Tweak Me!" button and select "SSD Optimization" option. Here you can enable/disable various options.
Tweak_Me_SSD_Optimization.png
Last but not least, the program also allows you to fix various system features like Boot defragmentation, prefetch, superfetch, hibernation, burning function, etc. Click on "Tweak Me!" button and select "Fixes" option. Now you can restore settings for these system features by clicking on "Restore Settings" button given for each feature.
Tweak_Me_System_Fixes.png
As a bonus this program also allows you to tweak various things in Windows 8 Developer Preview like enable old start menu, start Windows Explorer with ribbons minimized, enable snap feature for low resolutions, etc.
You can see its an ultimate tweaking utility for Windows which is absolutely free to download.
You can download it using following link:
Download Link

All About Resource Hacker in a Brief Tutorial, Ultimate Windows Customization Tool

Resource Hacker is a small but excellent tool to modify system files like DLL, EXE, CPL, etc. You can even change Windows look by editing various Windows files and replacing their resources using Resource Hacker.
You can download it using following link:
Download Link
This tutorial will help you in understanding this tool and will teach you how to use it. For your convenience, we have divided this tutorial in 2 parts:
  • PART 1: BASIC INFORMATION
  • PART 2: ADVANCED INFORMATION
Part 1 provides basic details like viewing or replacing existing resources in a file, etc. Part 2 covers some advance information for geeks, like adding new resources, using scripts, etc.

PART1 : BASIC INFORMATION
[Using Resource Hacker]
When you open a file in Resource Hacker, it shows various directories in left-side pane, like:
  • AVI - Contains AVI files
  • Cursor - Contains Cursor files
  • Bitmap - Contains BMP files
  • Icon - Contains Icons
  • Menu - Contains Menus
  • Dialog - Contains Dialog boxes
  • String Table - Contains Strings
  • Accelerators - Contains Shortcut keys
  • Version Info - Contains Version information of the file

[Viewing Resources]
You can view resource present in the file by expanding the directory given in left-side pane and clicking on the name of the resource. Each resource contains 3 important attributes:
  • Resource Type
  • Resource Name
  • Resource Language
[Changing Resources]
For Icons / Cursors / Bitmaps:
1. First select the resource ( e.g. Bitmap -> 131 -> 1033 ).
2. Now click on Action -> Replace Icon or Cursor or Bitmap....

3. It'll open a new window, click on Open file with new Icon or Cursor or Bitmap button.
4. Select the desired resource using OPEN dialog box, click on Open button and then click on Replace button.
For Other Resources like AVI:
1. Click on Action -> Replace Other Resource....
2. It'll open a new window, click on Open file with new resource button.
3. Select the file and click on Open button.
4. Now you'll need to provide following required information for the resource, which we mentioned earlier:
  • Resource Type
  • Resource Name
  • Resource Language

Resource Type: Mention type of the resource, e.g. if you are replacing AVI file, mention the type as AVI
Resource Name: Provide the same name of the existing resource which you want to replace
Resource Language: Provide language code for the resource, e.g. 1033 for English. You can check existing resource's language code.
5. At last click on Replace button.
[For Menus / Strings / Dialogs]
To change any String, Menu or Dialog box, Select the desired resource, e.g. String Table -> 4 -> 1033, make your changes and at last click on Compile Script button.

It'll immediately compile the script. If you made any mistake while modifying the resource, it'll generate error message so that you can fix it.


PART2 : ADVANCED INFORMATION
[Adding New Resources]
Adding New Bitmaps / Icons / Cursors / AVIs:
1. Click on Action -> Add a new Resource....
2. Now click on Open file with new resource button.

3. Select the desired resource and click on Open button.
4. Give Resource Type, Name and Language as mentioned earlier. But keep in mind that Resource Name should not match with any existing resources name.
5. At last click on Add Resource button.
Adding New Menus:
Go to desired menu, e.g. Menu -> 215 -> 1033. Now add a new line anywhere inside POPUP "" using following format:
MENUITEM "Custom_String", 12345, MFT_STRING, MFS_GRAYED | MFS_DEFAULT
Where:
  • "Custom_String" is the actual text which you want to show in menu.
  • 12345 is the identifier. It must be different from existing menuitems.
  • MFS_GRAYED disables the menuitem. You can change it to MFS_ENABLED if you want to show your menuitem enabled.
  • MFS_DEFAULT shows your menuitem in BOLD. You can omit it.
  • You can also add a new attribute in the code MFS_HILITE which automatically selects your menuitem.
In fact you can only add following new line in code:
MENUITEM "Custom_String", 12345
And Resource Hacker will automatically insert other remaining values as mentioned above.
[Inserting Newly Added Resources in Dialog Boxes]
Once you finish adding new Icons / Bitmaps / AVIs, you can insert them in any dialog box so that you can show in various Windows dialog boxes like RUN, Progress Dialog box, etc.
1. Go to the desired dialog box, e.g. Dialog -> 1020 -> 1033
2. Right-click in the dialog box and select Insert Control option.

3. It'll open a new window. You'll see many controls in the new window, like BITMAP, LABEL, ICON, BUTTON, SysAnimate32 (for AVIs), etc.
4. Click on any desired control, e.g. to insert a Bitmap, click on the BITMAP control or to insert an AVI, click on SysAnimate32 control.

PS: You can also insert Date/Time in dialog box using SysDateTimePick32 control.
5. Don't forget to fill the Caption entry. You need to enter the Resource Name in Caption textbox, e.g. if you have added a Bitmap and set its Resource Name as 401, then give the same 401 in Caption textbox.

PS: For AVI Control ( SysAnimate32 ), you'll need to append # in Caption value, e.g if the AVI name is 144, then put #144 in Caption textbox.
6. At last click on OK button & then Compile the script.
7. If you want to change the position of the new control in dialog box, simply click on the control and drag it to your desired location or you can also use arrow keys to move it.
Using Scripts in Resource Hacker
We can also run Resource Hacker using Command Prompt and can use scripts to automate lots of repeatative tasks to save our time.
You can use scripts in 2 ways:
  • Single Command
  • Multiple Commands
[Single Command]
You can use following commands in Command Prompt to perform actions using Resource Hacker:
-add ExeFileName, ResultingFileName, ResourceAddress, ResourceType, ResourceName,
-addskip ExeFileName, ResultingFileName, ResourceAddress, ResourceType, ResourceName,
-addoverwrite ExeFileName, ResultingFileName, ResourceAddress, ResourceType, ResourceName,
-modify ExeFileName, ResultingFileName, ResourceAddress, ResourceType, ResourceName,
-extract ExeFileName, ResourceAddress, ResourceType, ResourceName,
-delete ExeFileName, ResultingFileName, ResourceType, ResourceName,
Where:
  • ExeFileName - Source file name
  • ResultingFileName - Output file name
  • ResourceAddress - Resource location (e.g. Bitmap path stored in your hard disk)
  • ResourceType - Resource type (e.g. Bitmap, AVI, etc.)
  • ResourceName - Resource name (e.g. 131, 1020, etc.)
Example:
ResHacker.exe -addoverwrite explorer.exe, explorer1.exe, MyImage.bmp , bitmap, 143,
[Multiple Commands]
You can also run a series of commands using script. First you'll need to create the script file using Notepad and then you can run it using following command:
ResHacker.exe -script ScriptFileName
Where, ScriptFileName is the name of the script file which you created in Notepad.
Following is the required format of the script file:
[FILENAMES]
Exe=
SaveAs=
Log=
[COMMANDS]
-addoverwrite ResourceAddress, ResourceType, ResourceName
Where:
EXE= contains source file name
SaveAs= contains output file name
Log= contains LOG file name which will store a detailed log of the operation
[COMMANDS] section contains the command-set which we want to perform on the source file.
PS: You can omit the LOG= entry in script file. In this case, Resource Hacker will automatically create a LOG file with the name "ResHacker.log".
NOTE: If you are facing problems while saving a file after editing in resource hacker, then make sure you have disabled WFP (Windows File Protection) service using "WFP Patcher" or use "Replacer" to replace the file. Both utilities can be found in our "Download" section.
Also if you are getting error "Can't create file...", that means you have edited and saved the same file in past and there is a backup file which needs to be deleted before saving this file again. Go to the folder containing this file and you'll see a similar file having "_original" in its name. Delete it and try to save the file in resource hacker.

Microsoft Releases Hotfix to Fix a Bug in Windows 7 SP1 When Some Files in USB Drivers are not Updated

This bug is found in those Windows 7 and Server 2008 R2 systems which were upgraded to SP1 manually, i.e. you installed Windows 7 and Server 2008 R2 without SP1 first and then manually upgraded to your system to SP1 by running its installer.
If you are using a slipstream version of Windows 7 SP1 or Server 2008 R2 SP1, this bug will not occur in your system.
SYMPTOM:
Official words from Microsoft:
After you install Windows 7 Service Pack 1 (SP1) or Windows Server 2008 R2 Service Pack 1 (SP1), binary files in some USB drivers are not updated. For example, the Usbport.sys, Usbehci.sys, and Winusb.sys binary files are not updated.
Information from our reader "Tito":
Of the several USB-related driver files updated by SP1, three files, usbport.sys, usbehci.sys, and winusb.sys (note: not all hardware configurations use winusb.sys, so it is normal for it to be missing) were only partially updated; i.e., the SP1 installer only updated the "repository" copies of these files, i.e., the copies found in WinSxS and DriverStore. The "active" copies, found in System32\Drivers, are not updated (this is a bug with the installer). People who did a new installation using an integrated ISO are not affected (both the "repository" and "active" copies are 7601) (so this only affects a 7600->7601 update), and other USB-related driver files seem to be unaffected (e.g., the SP1 installer updates both the "repository" and "active" copies of usbhub.sys).
Fix:
Just download official Microsoft fix using following links:
Download Update for Windows 7
Download Update for Windows 7 (64-bit)
Download Update for Windows Server 2008 R2 (64-bit)
Download Update for Windows Server 2008 R2 (Itanium based)

Computer Restarts Instead of Hibernate After Installing Service Pack 1 (SP1) in Windows 7

Many Windows 7 and Server 2008 R2 users have faced a strange problem after installing Service Pack 1. Whenever they try to hibernate their computer, it restarts instead of hibernate.
Microsoft has confirmed this issue and has released update to fix it.
Symptom:
Consider the following scenario:
  • You have a computer that is running Windows 7 or Windows Server 2008 R2.
  • You use a SCSI miniport driver as the memory dump file device driver or as the hibernation file device driver on the computer.
  • You install one of the following updates:
    • Hotfix 2320550
    • Windows 7 and Windows Server 2008 R2 Service Pack 1 (SP1)
In this scenario, one of the following issues occurs:
  • When a fatal error causes a Stop condition, the operating system does not generate a memory dump file of the system memory.
  • When you try to hibernate the computer, the computer restarts instead of hibernates.
Cause:
This issue occurs because the operating system cannot use the features that are required to create the memory dump file or the hibernation file on the SCSI miniport device.
Solution:
Download and install following update to fix it:
Download Update for Windows 7 (32-bit)
Download Update for Windows 7 (64-bit)
Download Update for Windows Server 2008 R2 (64-bit)
Download Update for Windows Server 2008 R2 (IA-64)

Computer Freeze or Restart to a BSOD having “0xc0000034″ Error Message after Installing Service Pack 1 (SP1) on Windows 7 or Server 2008 R2

Consider the following scenario:
  • You install Windows 7 Service Pack 1 (SP1) or Windows Server 2008 R2 Service Pack 1 (SP1) on a computer.
  • You install some other updates before you restart the computer to complete the installation process. Or, the service pack is installed at the same time as other updates by using Windows Server Update Services (WSUS).
In this scenario, the computer may stop responding or restart. If the computer restarts, you receive an error message that resembles the following on a black screen:
0xC0000034
Note: If the computer stops responding and you restart the computer, you receive the same error message.
CAUSE:
This issue occurs because Windows tries to perform operations in the Primitive Operation Queue (POQ) two times during the service pack installation process. The second attempt to perform these operations fails (because the operations have already been performed). Therefore, Windows generates a "0xc0000034" error.
SOLUTION:
Microsoft has released an update to prevent the issue. You can download it using following link:
Download Link
Download Link (64-bit)

How to Change SATA Hard Disk Mode from IDE to AHCI / RAID in BIOS after Installing Windows?

You got a new computer system in which the SATA hard disk controller mode in BIOS settings was set to IDE ( or IDE Compatibility or Standard IDE) instead of AHCI (Advanced Host Controller Interface) or RAID for better compatibility. You didn't notice that and installed Windows. After sometime you realized it and changed the SATA mode from IDE to AHCI or RAID in BIOS and BOOM!!! You made your Windows crashed. Windows will no longer start and will show a BSOD (Blue Screen Of Death) containing error code "STOP 0x0000007B INACCESSABLE_BOOT_DEVICE".
Windows_BSOD.png
Why??? Because Windows can't load the new drivers for AHCI or RAID interface. Actually when Windows is installed, it automatically disables unused storage drivers to speed up Windows startup process.
As a temporary fix, you can reset the SATA mode from AHCI or RAID to IDE in BIOS but you'll find yourself in the same situation. Or you can reinstall Windows but that would require lots of time and efforts.
Then how to switch SATA hard disk mode from IDE to AHCI or RAID in BIOS after installing Windows so that you would not need to repair or reinstall Windows?
Here is the solution! You just need to tell Windows that hard disk mode is going to change upon reboot using Windows Registry and Windows will automatically detect the mode and will install the required drivers and you'll be able to successfully change the SATA mode in BIOS without any need to reinstall Windows.
So without wasting time lets start the tutorial:
1. First DO NOT change SATA hard disk mode settings in BIOS, leave it to the default settings which were used while installing Windows.
2. Now start Windows and type regedit in RUN or startmenu search box and press Enter. It'll open Registry Editor.
3. Now go to following keys one by one:
HKEY_LOCAL_MACHINE\SYSTEM\CurrentControlSet\services\msahci
HKEY_LOCAL_MACHINE\SYSTEM\CurrentControlSet\services\pciide
In right-side pane, look for a DWORD "Start". Double-click on it and set its value to 0 (That's zero and not alphabet O).
Reset_SATA_Hard_Disk_Mode_AHCI_Settings.png
Reset_SATA_Hard_Disk_Mode_IDE_Settings.png
4. If you are using RAID or other interface, do the same thing for following key as well:
HKEY_LOCAL_MACHINE\SYSTEM\CurrentControlSet\services\iaStorV
In right-side pane, look for a DWORD "Start". Double-click on it and set its value to 0 (That's zero and not alphabet O).
Reset_SATA_Hard_Disk_Mode_RAID_Settings.png
5. That's it. It'll reset the hard disk mode settings in Windows registry. Close Registry Editor and restart your system.
6. Now enter into BIOS settings and change SATA hard disk mode to AHCI or RAID according to your requirements.
Change_SATA_Hard_Disk_Controller_Mode_BIOS.png
7. As soon as Windows will start booting, it'll automatically detect the change and will install the appropriate drivers. Once the drivers are installed, Windows will boot without any problem and you'll not need to reinstall Windows just to change SATA hard disk mode.
PS: If you don't want to edit the registry manually and want a ready-made registry script to do the task automatically, download following ZIP file, extract it and run the extracted REG file. It'll ask for confirmation, accept it:
Download Registry Script

Wednesday, November 9, 2011

Restore .EXE File Association in Windows 7/Vista After Incorrectly Associating It With Another Program

Did you accidentally use Default Programs or the Open With dialog to associate .exe file types with some application, causing every program to open in that chosen application? Windows provides no option to reset the .exe file associations, and you’ll have to do this manually. For example, one of our readers accidentally associated executable files using Notepad, and this caused Notepad to open every time when a program was launched.

When you use the Open With dialog to associate .exe files with another application, the settings are stored in the following registry key:

HKEY_CURRENT_USER \ Software \ Microsoft \ Windows \ CurrentVersion \ Explorer \ FileExts \ .exe \ UserChoice

There will be a value named Progid in the right pane. The Progid data will contain the application’s exe file name (Applications\Notepad.exe, Applications\IExplore.exe, or a Programatic Identifier such as txtfile, jpegfile etc).

Note that despite this problem, you should be able to launch applications by double-clicking on the data files. For example, with the above setting, you should be able to launch Microsoft Word application by double-clicking on a .doc file, but not by running Winword.exe directly.)

Resolution

You need to delete the UserChoice key above using a REG file or a script. Download exefix_cu.reg, and save it to Desktop. Right-click on the REG file and choose Merge.

(Hint: To undo the Open With setting for other file types, the registry location is the same. Replace the text .exe in the above registry path with the actual file extension.)

Example:

HKEY_CURRENT_USER \ Software \ Microsoft \ Windows \ CurrentVersion \ Explorer \ FileExts \ .xyz \ UserChoice

Where .xyz is the file extension for which you want to undo the Open With action.

Windows 7 Versus Mac OS X Leopard: The Feature-by-Feature Showdown


Now that we know Windows 7 will go on sale October 22nd and the feature-complete release candidate is available as a free download, it's time to put it through its paces: as compared to the current state of the Mac.

Oh, I know: the Mac versus PC debate is so played out. Perhaps, but dumb commercials aside, if you're deciding between buying a Mac or a PC in the coming months, it helps to know what you're getting from one or the other. I use both a Mac and a PC every day of the week, and both systems have their strong and weak points.

Note that I'm basing my observations on the Windows 7 Ultimate Release Candidate 1 (Build 7100) and Mac OS X Leopard 10.5.7. You could argue that I really should be comparing Windows 7 to the upcoming Snow Leopard, and you'd be right. If I had a copy of Snow Leopard to run I'd do that. Alas. As always, take all comments salted with a few grains of "this is all one person's opinion" and "what I should get depends on what I need." Also, remember to breathe. Let's do this.